Showing posts with label GIS 4102. Show all posts

Sunday, August 10, 2014

GIS 4102 Module 11 - Sharing Tools

Sharing tools was the subject of the final module for GIS Programming. After modifying a script so that it could be embedded right into the pertinent tool, the script was embedded and then password protected. Embedding a script directly into the tool improves the ease with which the tool can be shared. Password protecting the script prevents anyone from viewing or exporting the script without the password. The tool's dialog box and the results from this module's embedded script can be seen here:
Results from Embedded Script and Tool's Dialog Box

Initially working with Python was frustrating, but continuing with it was fruitful. It quickly became obvious that the more Python is used, the easier it is to use and understand. While there still are several things that are not clearly understood, finding the right resource for clarification is becoming quicker. Implementing what has been learned will be important to retaining it.

And just in case anyone is wondering...having your elderly parents actively test the local hospital's emergency room to see if they will provide services at 2-for-1 cost for seniors just before final exam is not conducive to completing course work in a timely fashion. I'm just saying. (Both are fine now and in their own home again.)

Good luck to everyone in their Python and GIS endeavors!

Tuesday, July 29, 2014

GIS 4102 Module 10 - Creating Custom Tools

Learning about script tools this module was quite awesome. The use of parameters instead of hard-coded information as is used in stand-alone scripts provides so much flexibility and transferability of the script. Another advantage of script tools over stand-alone scripts is that message statements which are written to a progress dialog box and the Results window can be in a script tool. This allows the retrieval of results messages at a later time. Stand-alone script messages are printed to the interactive window and cannot be retrieved later. While the use of stand-alone scripts requires some knowledge of Python, the use of script tools does not require knowledge of Python. The script tool's dialog box is a convenient way for users to enter parameters with validation and error-checking included. The script tool window for this assignment is shown here:
Script Tool Window Showing Parameters Ready for Input
Even the creation of a script tool is relatively easy. After verifying that the stand-alone script forming the basis of the script tool works properly, a new script tool is added to a toolbox in ArcMap's Catalog. The new script tool is given a name, label, description, script file, and so on before parameters are added. After properties for each parameter are set, the original stand-alone script is edited to replace hard-coded filepaths or file names with the applicable parameters from the script tool. Print messages in the stand-alone script are replaced with message statements. This image shows the messages after running the tool for this assignment:
Resulting Messages from a Script Tool Which Clips
Several Layers to a Single Feature
Once the performance of the script tool has been confirmed, the script and toolbox containing the script tool can be zipped together into a folder. VoilĂ ! It's ready to share with anyone else. Just for fun, I emailed the zipped file to myself and used it with some other data. Here's an image of Orange County, Florida, with roads and some other features clipped to the county line...another demonstration of the incredible functionality and adaptability of Python scripting:
Orange County, Florida, with Features Clipped Using Script Tool

Friday, July 25, 2014

GIS 4102 Module 9 Assignment: Debugging & Error Handling

Figure 1
First Script - List of Airports
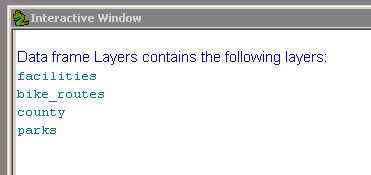
Debugging and handling errors were emphasized in this week's module. Having experienced quite a bit of debugging my own scripts in this course, especially with syntax and using the technique of commenting out sections of code, this exercise and assignment were extensions of that but also included try-except statements. The first script, with results shown here, contained two relatively easy syntax errors which allowed the script to run after correction. A list of airports was printed as a result (Figure 1).


Finding the eight errors in the second script took longer. The errors in the second script included misspellings, incorrect punctuation, and arguments along with incorrect mxd and path names. Once corrected, the script printed out a list of layers in the data frame as shown in Figure 2.

Figure 2
Second Script - Layers in Data Frame
Although in retrospect it was relatively easy, the third script took the longest. This was due primarily to determining where to place the try-except statement which, once placed correctly, allowed the script to run through to completion with an error message being printed for Part A and select data frame properties being printed for Part B. These results are shown in Figure 3.

Figure 3
Third Script - Error Message and Specified Data Frame Properties 

The step-through mode of the debugger was quite helpful for this assignment. All the techniques for error and exception handling will be very useful in future assignments during the course and employment.

Friday, July 18, 2014

GIS 4102 – GIS Programming Module 8 – Working with Rasters

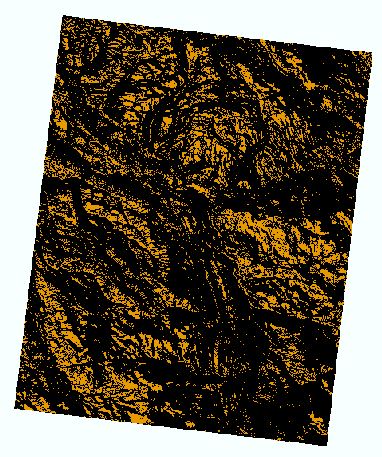
The purpose of this week's lab assignment was to produce a composite raster from 5 intermediate rasters which were created using various aspects of  the spatial analyst extension. After writing code to determine whether the spatial analyst extension was available, it was checked out, and the fun began. Three land cover classifications were assigned identical values; reclassification of the land cover raster was based on those new values. From the elevation raster four intermediate rasters were created based on slope and aspect values (slope between 5-20° and aspect between 150-270°). Finally, the five temporary rasters were combined into one raster which was saved, and the spatial analyst extension was checked in.


Final Raster Depicting Landcover Classification 1,
Slope 5-20°, and Aspect 150-270°
The main problem that I had with this particular script was that the outcome did not match the sample provided in the lab instructions. I had three colors in ArcMap instead of two. A big concern is that I would not have caught this error (since my script ran without trouble or messages) except that I was able to make this comparison and noticed the difference between my results and the lab instructions sample. The resolution of this issue turned out to be rather simple.

Because I remembered being confused by the inclusion of “NODATA” as a parameter in the reclassify portion of the lab exercise on p. 17 which is what I modeled my script on, I revisited that information in the text and learned that the 4th parameter is optional. I removed “NODATA” from my script, ran it again, and got the desired results, shown here.

With the completion of each lab, I am more impressed by what can be done in ArcMap with Python. I'm looking forward to the next lab!

Friday, July 11, 2014

GIS 4102 – GIS Programming Module 7 – Working with Geometries

The assignment for this week's module involved creating a text file with data from a rivers shapefile. This turned out to be a greater challenge than creating a shapefile from a text file. Before committing my scripting results to the text file, I worked out the kinks with just a version printed to the interactive window. After it was printing the proper results, I went back and added the write command. The pseudocode for this assignment is shown below along with a portion of the resultant text file:


Start
Text File Created from a Shapefile
Import modules & classes
Set workspace
OverwriteOutput
Set output path
SearchCursor (OID, SHAPE, NAME)
Open text file
Processing statement
Row Loop
        Set vertex counter
        Point Loop (getPart)
        Increase counter
        Print row
        Write row to text file
Process complete statement
Close text file
Delete row
Delete cursor

End

This scripting turned out to be more challenging than I expected. Something that I found helpful was to comment out certain sections of code while I was making adjustments. That way not only did I preserve code that was working, but I also could alter other code to get the results I needed.

Friday, July 4, 2014

GIS 4102 GIS Programming Module 6: Explore/Manipulate Spatial Data

First Portion of Results
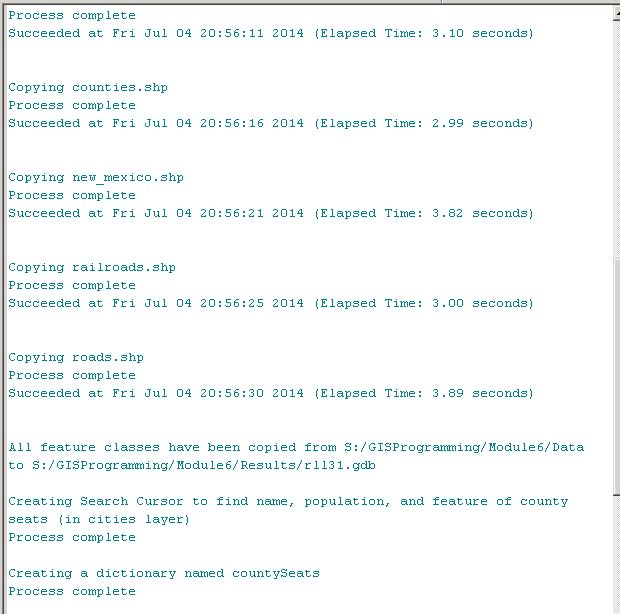
The assignment for this module started with a script template which was expanded using the skills learned in the exercise portion of the module. Provided shapefiles were stripped of their .shp extensions and added to a new geodatabase by a scripted for loop. A search cursor was used to retrieve only those cities identified as county seats in the "FEATURE" field of the cities layer . Another for loop was used to populate a newly created dictionary with the names and populations of those county seats. The results of the script are shown in this series of screenshots.
Middle Portion of Results
A troublesome spot I encountered was being unable to delete my geodatabase after having run the script multiple times. That “Failed to delete…” error message became a bit annoying. Initially I started deleting feature classes individually, and then discovered that I could not delete the “cities” layer because of a schema lock. After reviewing schema locks in the text, it became clear that del row and del cursor needed to be included.

The next part of this problem came up: how to run the script with the changes if the geodatabase could not be deleted until the lock was lifted which could not be done without creating a geodatabase. Vicious cycle, I say. A temporary geodatabase was created, del row and del cursor were added to the script, the original geodatabase was unlocked, and deleted. The temporary geodatabase was also deleted, and the script was revised back to the name of the original geodatabase. All of this would have been unnecessary had I remembered to close ArcMap before running Python script. C'est la vie! I'll remember that now!

Final Portion of Results

Sunday, June 15, 2014

GIS 4102 GIS Programming Module 5: Geoprocessing with Python

This week's module included using tools after setting the workspace. This specific script used the AddXY tool, the Buffer tool, and the Dissolve tool to add XY coordinates to a hospitals layer, add a buffer of 1000 meters around each hospital, and finally dissolve the buffers into a separate, single feature. Prior to using these tools, a copy of the original layer was created in order to retain that information unchanged. Since variables are very helpful in creating code that is reusable and can be shared, I took this opportunity to practice assigning variables to input and output features. There was also an opportunity to apply Comment Out Region to a section of code while making adjustments to the code. The script included code to print out the tool messages directly after each tool was run. These are shown in the image below.

PythonWin is my preferred place for scripting. Throughout the scripting process I double-checked that results were added to ArcCatalog. After the script was completed, it was run in ArcMap; the code running through its cycle and adding the results of each step to a map was quite amazing to watch. With each Python exercise and assignment, terms and coding are becoming more familiar making scripting easier overall.
Tool Messages Printed after Each Tool Ran